
AB-621 Tower Setup Guide
The club owns two US Army spec AB-621 tower and mast systems. I have yet to find an authoritative source stating exactly what it was used for, or the proper usage manual.
The operator’s manual for this mast has US Army identification number TM 11-5985-334-10: Operating Manual. I could not immediately find any PDFs of it, but I did find the maintenance manual, which refers to the operating manual. I am working on acquiring a copy of the operating manual and hoping that it contains more information about what it was used for when in service.
If anyone has more authoritative information on the AB-621, please send it to kn6ubf@paara.org.
Table of Contents
- Overview
- Required Tools
- Assembling a crew
- Safety Procedures
- Unpacking
- Preparing the Base and Area
- Operating the guyline tensioners
- Mounting the antenna
- Erection and Hoisting
- Teardown and Packing
- Common Gotchas and FAQs
Overview
The AB-621 is one of the club’s portable tower and mast systems. It is used for Field Day and other deployments that need a tall, stable mast for a beam antenna and can handle putting large stakes into the ground.
Required Tools
- Some kind of large hammer (standard or power assisted) to drive stakes into the ground (stored with tower)
- 9/16” socket (for tightening and loosening mast adapter)
- Level (do not level by eye)
- Crank handle (stored with tower) or drill with square drive adapter (if hoisting with power)
- Work gloves (for holding guylines)
- Hard hats (this process involves a fall area)
Assembling a crew
You will need at least eight people for this job. There are specific roles and the process works best if people stick to their specific roles.
- Crew captain: The crew captain is in charge of the general assembly process. In particular, during hoisting, the captain is responsible for deciding when the brake is on and off, and when to go how high. The crew captain may also serve as the crank operator.
- Crank operator: The crank operator is the one who actually raises and lowers the antenna by operating the crank.
- Tube operator: The tube operator positions each tube in the elevator during hoisting and removes it during teardown. This role can be filled by another crew member while the tower is stopped.
- 4 guy operators: One guy operator holds each guy line. There is a special technique that works the best for this, which will be described in the hoisting section below.
- 2 spotters: We recommend using two spotters, one for each axis. They should stand directly behind the guylines, and are responsible for telling each guy operator on the opposite axis when to pull/let out.
From those 8 people, two should be chosen (or two additional people should be found) to “catch” the antenna onto the bottom of the mast before hoisting.
Consider this a minimum. There are a couple of jobs listed above that are replicated and can be split further. Also, the number of people required to lift the antenna and hand it to the “catchers” is variable depending on the weight and bunk of the antenna being lifted.
If anyone tries to tell you that “this was a two man job according to the military” and “eight people is ridiculous for this job”, politely tell them to leave the area.
It’s very easy to end up with “too many cooks” in this kitchen. Make sure to listen to the crew captain on what they think is the right thing for people to be doing, and let them yell “brake on” / “going up” / “brake off” etc. Replicating that will cause confusion.
Safety Procedures
- Only one crew captain issuing instructions
- When guying/spotting, keep your attention focused on the tower
- Wear hard hats when in the area
- No unnecessary individuals in the fall area of the tower while hoisting
- Do not step away from the guylines until they are attached and tightened
Unpacking
The antenna is stored mostly in three parts:
- A pile of stakes at the front of the box trailer
- A footlocker of guylines, crank handle, guy collars, mast stub, mast adapter, etc
- The main mast elevator section, which also serves as storage for the tube sections. There are eight tube sections, stored two side by side and four high.
- The tube carrier comes out of the tower base section.
To unpack:
- The towers are stored at the back of the box trailer, with the foot lockers and some other stuff in front of them.
- First, remove whatever stuff is blocking them, and then remove one of the footlockers to get out of the way of the tower.
- Take the tower out of the truck. They are heavy. You will need about 3-5 people to carry them. When carrying them, hold by the structural pieces of the mast section, not by the hinged part. It could get bent.
- Stakes are stored in the front of the trailer. Take four stakes out.
- Take the tube sections out of the mast
Preparing the Base and Area
Find a reasonably level area. The base of the tower needs to be level. There are two kinds of stakes for this tower. Small, silver-colored steel stakes (3 per tower, stored in the footlocker), and large green stakes (which are the ones you pulled out of the front of the box trailer).
- In the flat area you found, put the tower base (the thing you just took all the tubes out of) upright (with the mast adapter facing up).
- Hammer the three small stakes through their holes in the bottom of the tower base. They do not put very much force on the tower, just enough to hold it in place securely enough to get the guylines on.
- Make sure the tower is reasonably level in all directions. Place the tower so that at least one corner is upwind. This is because we want one of the axes with guylines to be in the upwind/downwind direction.
- Find the shortest of the three sets of guylines. Our guylines are color-coded red, white, and blue (with red being longest, white being middle, and blue being shortest) with tape or paint (depends on the tower).
- Unwind the blue guylines, and attach them to the top of the base of the tower. The end with the tensioner/winder should be away from the tower, and the end without it should be closer to the tower.
- Make sure the guylines are extended almost as long as they can go (see the Operating the guyline tensioners section below for instructions), and use the length of the guyline to place the stakes. The guylines should go out along the axis of the corner of the tower.
- Hammer the stakes until they have about 6 inches below the clip reciever (looks like a handle) sticking out of the ground. This is because we need enough space underneath the handle to pull the stakes out. Make sure the handle faces up. The clip should be facing towards the tower when under tension, not making any strange turns.
- Attach the stakes and get them reasonably tight, but not too tight. Again, see below for instructions on how to tension
- You will use the guylines to make the tower level. This is why 1) we left them only “reasonably” tight, and also why we left the tower “reasonably” level earlier. Tighten the lines as needed in each direction to make the tower level. Try to get it as level as you can, because we really want the tower to go up straight and have balanced forces. Attempt to put the level so that its bubble is perpindicular to the direction the guylines go out in. Also, level along structural elements.
- Once the tower is level and the guylines are tensioned enough that it will stay level, it’s time to put the first tube in.
- Attach the crank handle and/or drill to the crank.
- Lower the elevator to the bottom position. The brake should be opened for this section, because the brake holds against the tube.
- Place the tube section in the elevator. With the elevator all the way down, the tube doesn’t quite make it through the hole on the top. It helps to hold the top through the hole while winding the elevator up to support it
- Put the brake on after just enough of the mast is sticking through the base for the notch that the guyline collar can attach
- Attach the guyline collar to the tube by opening it and clipping it closed into the notch. There’s a key so the collar can only be closed in the correct position.
- Place the mast adapter into the top of the tube and attach it.
- We usually attach a halyard for hoisting dipoles to the collar. Do that now.
Operating the guyline tensioners
The guyline tensioners also serve as winders. There are hooks around which the guylines are wound. While stored, they should be all the way tight (that is, as small as possible). They are stored with a hook around them to keep the cable wound.
- First, unwind the guyline fully. Don’t let it tangle. Walk away from the place you leave one end
- The guyline tensioner can tension in two ways: there’s fine-grained tensioning by a screw, and coarse-grained tensioning by sliding the cable
- First, make the guyline as close to the desired length as possible by lengthening or shortening the cable. To do this, pull back the lock at the front of the cable, and pull open the bar that it locks. This bar is the “brake” that keeps line from moving through.
- Once it’s open, you can pull cable through from one side to the other. It helps to use two hands for this: one hand pushes line through from the side that has too much, and the other hand simultaneously pulls from the other side.
- Lock the cable by pushing the open bar into the catch point. It will click into place when it’s locked.
- Now that the cable should be close to the right length, run the screw part of the tensioner out most of the way. There is a ring with an arrow that says “tighten”. To loosen, turn the ring the opposite way. Loosening it all the way means you can’t loosen at all, without pushing more line. However, it’s more likely that you will need to tighten than loosen, so loosen most of the way.
To pack up the guyline, first, shorten (tighten) the winder/tensioner as much as possible. Then place the short end’s hook across, and then wind the long end to keep the short end from moving. Finally, place the chain and hook across the cable and into itself to hold it into place.
Mounting the antenna
Before proceeding to this section, the lowest section of the tower should be stable and level. The lowest guylines should be tightened down, the collar for the next set of guylines should be attached to the mast, and the next set of guylines should be attached to it.
You will need two ladders, one for each side of the tower. Place them there, and have two people climb them.
We have two “pushers” - aluminum pipes with v-shaped hardware on the ends that you can put the bottom of an antenna boom into for extended reach. They are helpful for this process.
- The AB621 has a stub mast (that you inserted into the top of the tube in the previous step)
- Some antennas (like our KT36A) have a mast that they come with. Others (like our KT34), do not, and need a mast to mount onto. a. For antennas without masts, the AB621 works as-is. You “just” slide them onto the stub mast and tighten down (see the antennas’ mounting instructions) b. For antennas with masts, we have a mast adapter (which is two receptacles for masts to slide into). Loosen the bolts on both sides (9/16” socket). Place the mast adapter onto the stub, and tighten the bolts back down to hold it in place.
Mounting the antenna works best in two steps. First, with two people still on ladders on either side of the tower, make sure:
- a 9/16” socket is easily accessible
- the two ladders are stable (having a person there holding them may be of use)
- everyone below them is wearing hard hats
- the tower is level and guylines are tightened down appropriately
Next, assemble a crew of lifters. The previously mentioned “pushers” will be useful. Orient the antenna parallel to the tower (so that the elements are pointing towards the people standing on ladders). Line it up so that the elements will not stab the “catchers” (on ladders) when the antenna is walked towards the tower, and it won’t catch on the tower or guyline.
Walk the antenna towards the tower, gradually lifting it as to keep it above the guylines. It helps to have a person on “leading edge duty” making sure the antenna elements don’t get caught in the guylines.
When the boom is close to the tower, hand the antenna to the catchers. If the antenna has a mast, it’s easier to rest the bottom of the antenna’s mast on any stable part of the tower, and allow the catchers a moment to organize before lifting the antenna into the mast adapter. The same is true for antennas without a mast, and using the stub mast directly, but it’s a bit harder because there’s less of an obvious place to rest the antenna.
After deciding on a strategy, lift the antenna and get it attached to the mast one way or another, tighten down the final bolts (either U-bolts on antenna or the mast adapter). Make sure the antenna is reasonably level, and the guylines on the bottom are tight. Attach the next set of guylines if not done yet (this is the longest red guylines because the part of the antenna you are working on now will end up being at the top.)
Do not forget to attach the coax now. Tape it in place below the connector to take stress off of the connector.
Erection and Hoisting
Hoisting Crew Arrangement
Now it’s finally time to lift the tower. You will need a minimum of eight people for this part of the job:
- an operator on each guyline
- two spotters, one for each axis
- crank operator
- hoist captain and brake operator
Make sure the field is clear and there’s nothing to trip over. Each guyline operator should walk out to the stake their guyline points towards. It should be very slack, as these guylines are set to the length for the top of the tower, and the tower is all the way down.
Have anyone not wearing a hard hat, and generally anyone not required for the lifting process step a bit away from the tower. This area is a fall zone.
Preparing to lift
There are two schools of thought about what to do now:
- Attach the guyline now, while it’s still slack, and tension it on the way up with it attached. The pro of this is you will know early if it’s too short, but the con is you need to be careful about paying attention to how much tension is on it, and not letting too much build up.
- Leave the guyline unattached for now, and only attach it when the tower is almost all the way up. The pro of this is you get more control of the process, but the con is that it may be slightly the wrong length when you get to attaching it.
I (KN6UBF) personally align more with school of thought 1. Both work. If you choose to attach the guylines at this time, make sure you clip them on the stake above the blue (shortest, lowest) guylines so that they don’t cross and interfere with each other.
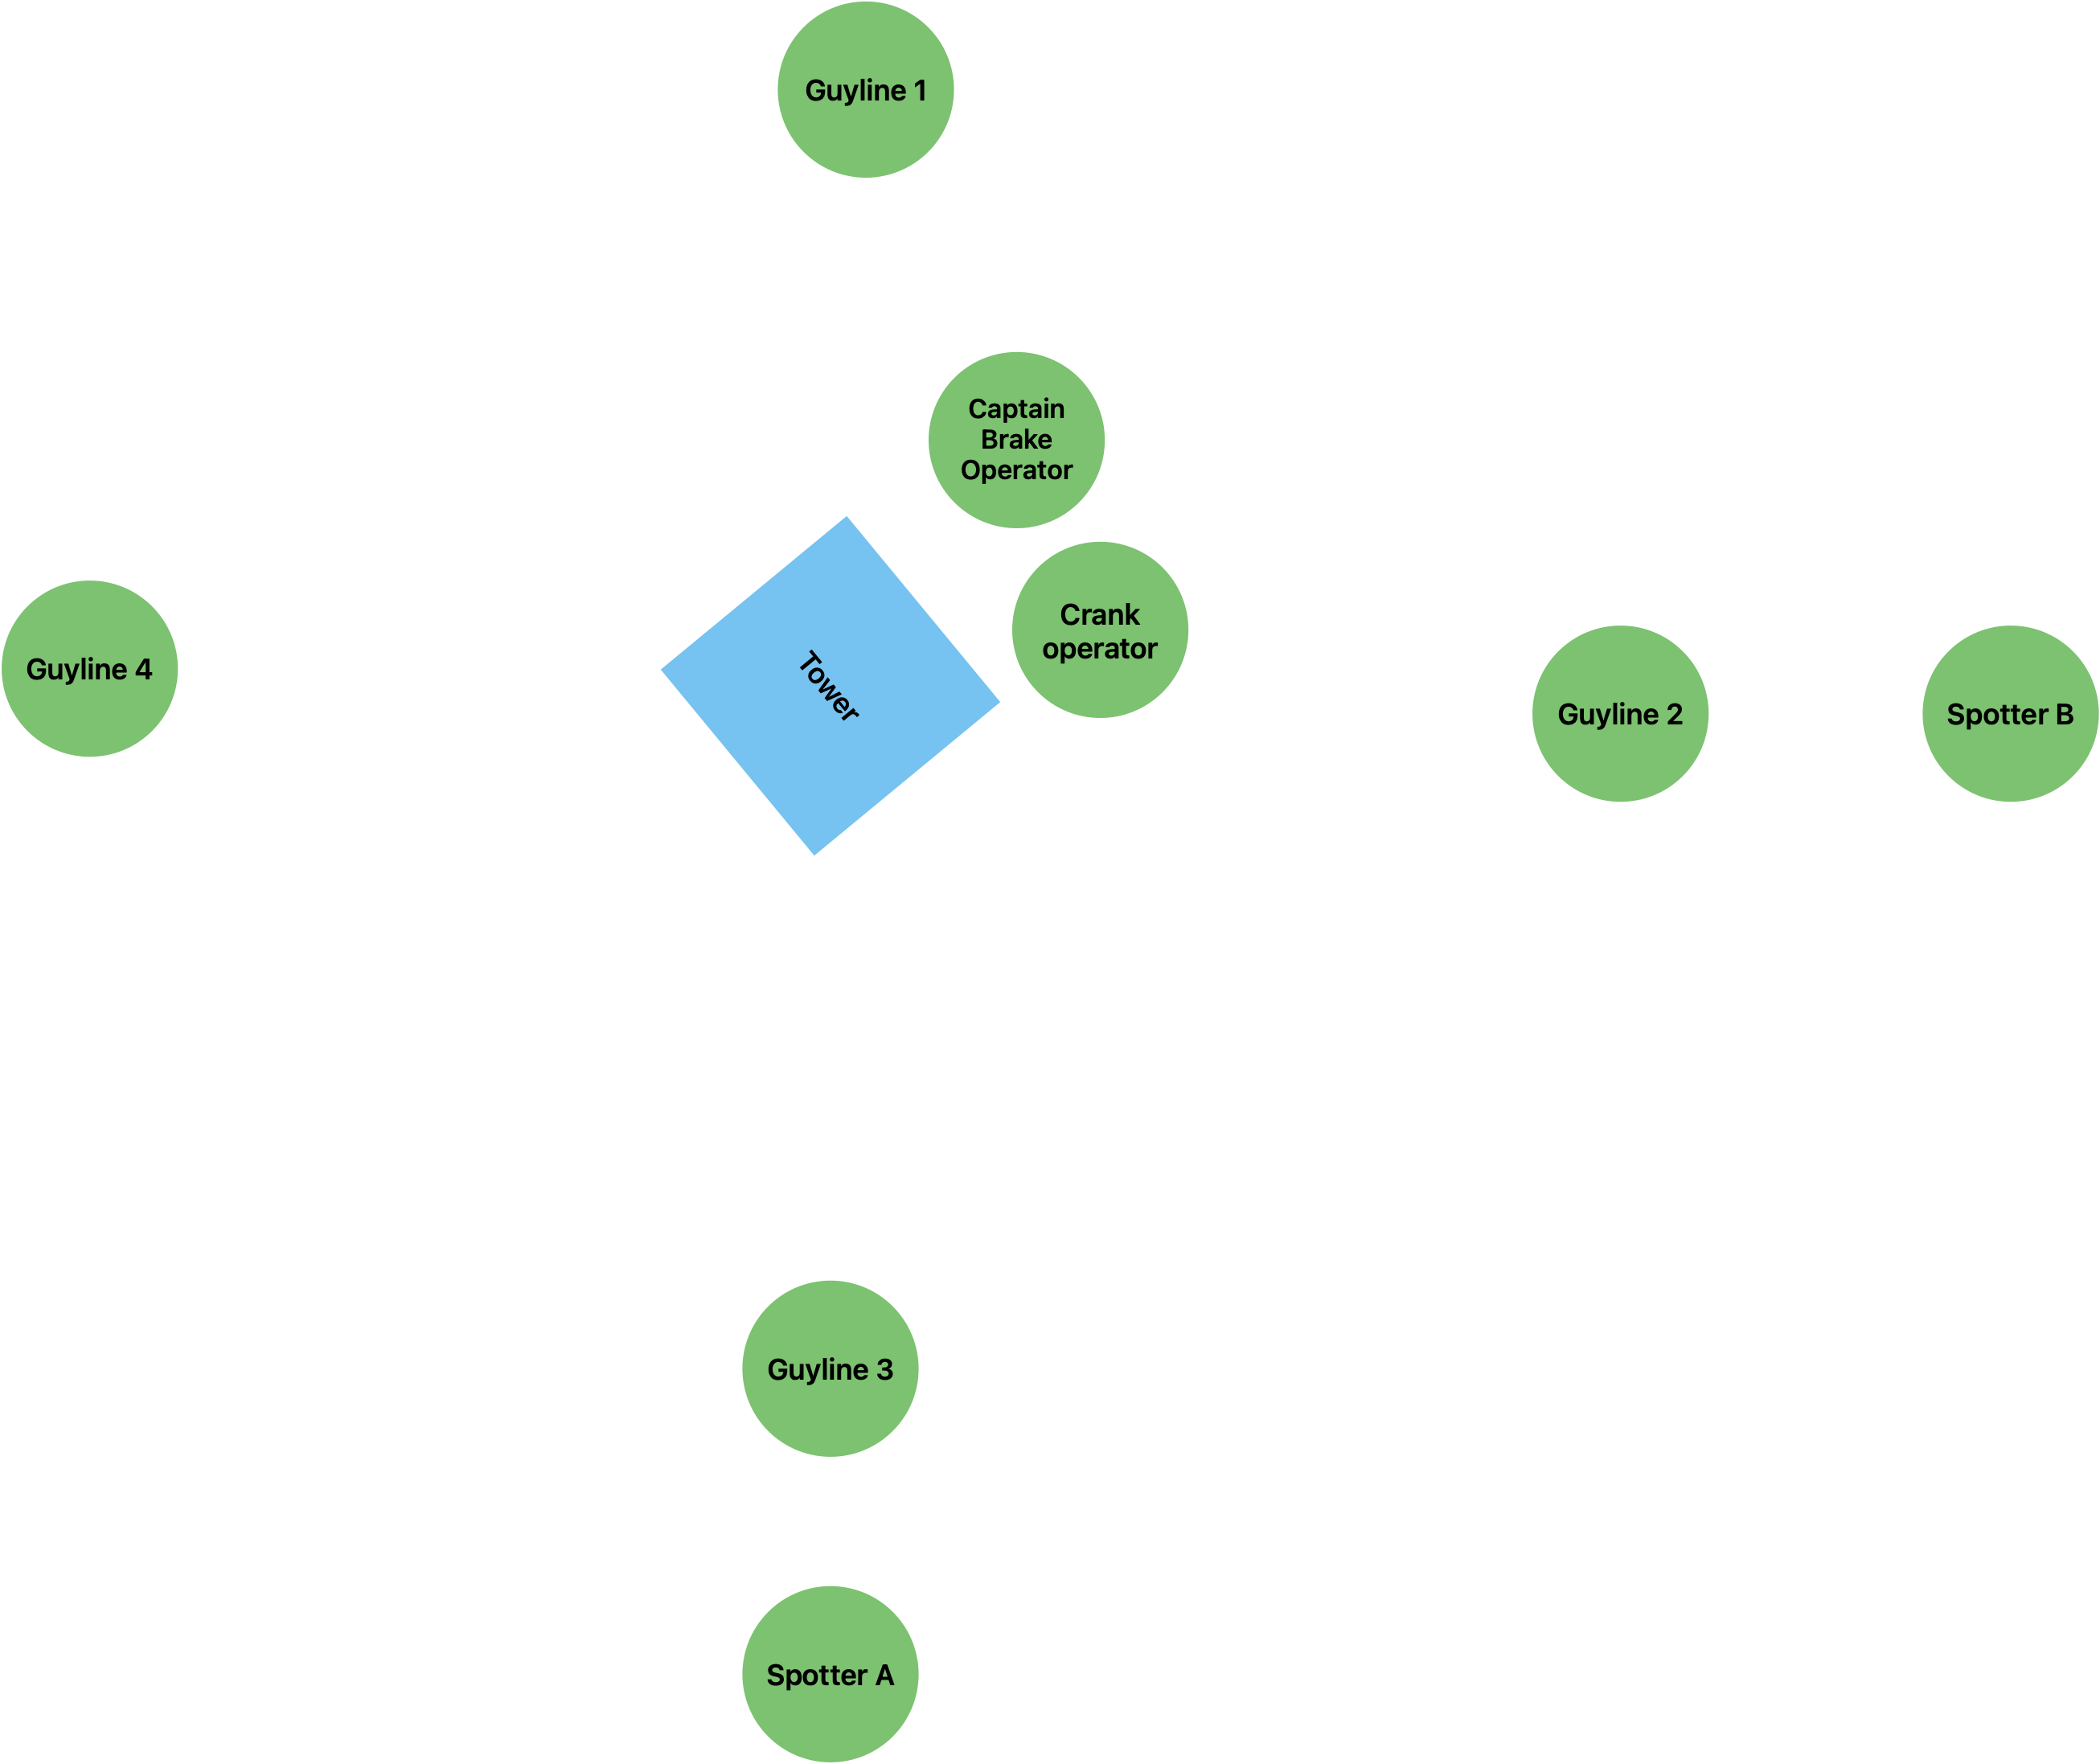
Arrange the crew as shown below (not to scale). Place each guyline operator at the corresponding stake and each spotter behind its assigned axis.
Some practical considerations:
- The guy operators directly across from each other should be as parallel as possible
- The guy operators not across from each other should be as perpindicular as possible
- The reason the spotters are directly behind the guy operators is so that they have the right angle to know if the opposite set of guy operators need to pull, and in which direction
- Make sure the spotters know the names of the two guyline operators they’ll be telling to pull in and let out. You don’t want confusion. For example, if two people with the same name have opposite guylines, assign temporary calls or use last names or initials or something.
- Guyline operators will be MUCH happier if they are wearing work gloves.
Before lifting, make sure all the guy operators know how to hold tension in the line. There are many ways to do this, but the one that I find the best involves using the operator’s back/waist and body to add tension. Stand out of line with the lower (tensioned) guyline. Stand inside the curve (see diagram below, not to scale).
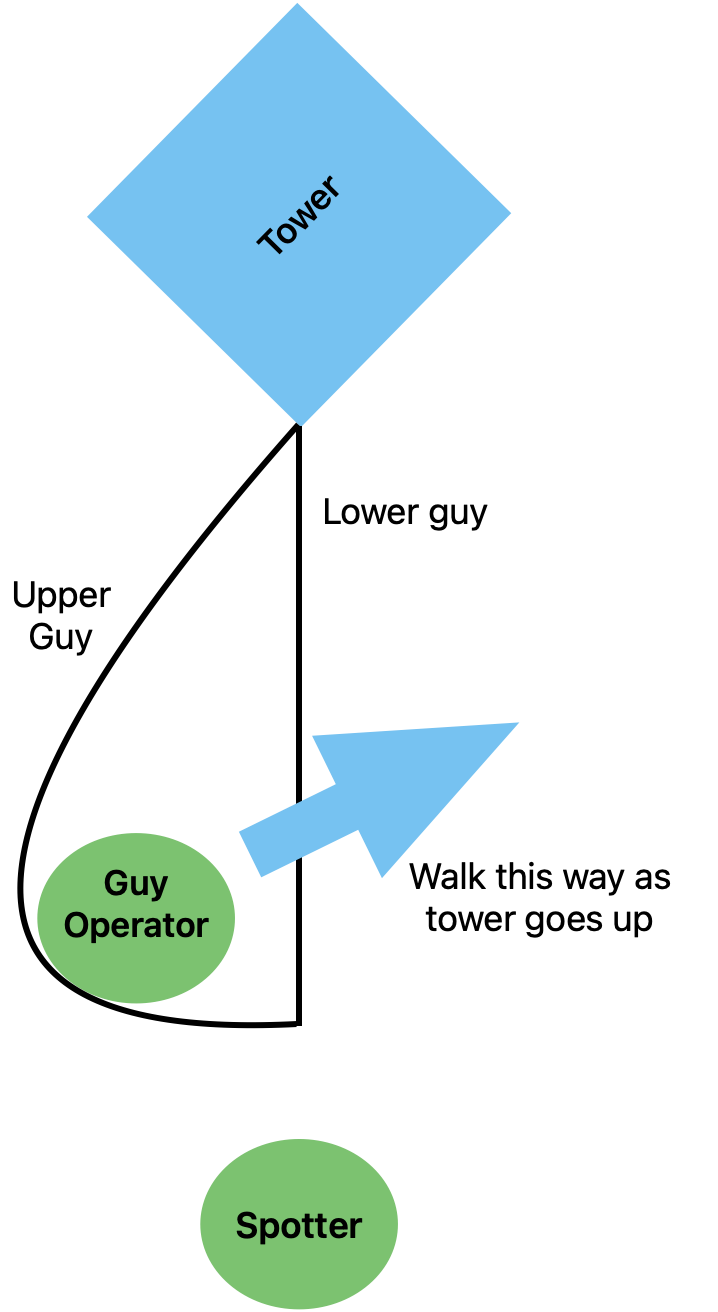
To add tension, step back, and lean into the line with the line around your back. I find that holding one hand on each side to guide the line around one side of your waist is the best way. This uses the friction of the line against your waist (belts are great for this) to provide most of the resistance. You must also hold the leading edge (towards the tower) of the line with a hand to have fine grained control.
IMPORTANT: do not wrap the guyline around both sides of your waist (that is, don’t have a loop in the guyline with you in the middle).
As the tower rises, the guyline will get shorter. First, allow any slack to rise out of the line. Then, walk inwards (away from the apex of the curve shown in the diagram) to release tension.
Lean back, walk back, and/or use your hands to apply tension on the line upon spotters’ request. Stand up straighter, walk forwards, or let out with your hands to release tension on spotters’ requests.
In the event of an incident, the line will either slacken (if the tower is falling towards you), in which case you are not impeded by it, or tighten and push you away from the tower (if the tower is falling away from you). It is important to continually focus on the tower while manning a guyline.
Use the diagram above as a reference for the relative positions during this technique.
Lifting the tower
Okay, now that readers are properly terrified, it’s time to start hoisting.
The tube carrier/tower base that you’ve put up and stablized also serves as an elevator. Each tube will be pushed up by the previous tube. The way this works is a crank uses a pulley to lift a platform which pushes a tube up. The tubes key into each other.
There is a friction brake which keeps the tower sections up. Whether the friction brake is on or off is critically important to remember, as the crank doesn’t have a brake in it, so it can spin rapidly under the weight of the tower and cause BIG problems if you let go while the brake is off. For this reason, the lift captain should make sure that they yell out “BRAKE ON” when it goes on, and “BRAKE OFF” when it goes off.
IMPORTANT: Only the lift captain should be yelling out brake status. This is to avoid confusion on what the status is.
To remind ourselves where we should be, before we start lifting:
- The antenna should be securely mounted to the tower, and tightened down
- The first section of the tube is therefore already in the tower with the antenna on top of it
- The tower base shoud be leveled, with the guylines attached to stakes and tensioned
- The first guyline collar should be attached to the top of the first section of the tower, with the halyard on one of the clips if desired
- The crew should know what their roles are, and prepared to carry them out
To operate the crank, use either:
- The crank handle supplied with the kit (and crank by hand) or
- A square-drive adapter attached to a drill with sufficient torque. DO NOT use an impact device (drill, wrench, or driver) as they do not give nearly enough control for this process.
Inserting and lifting the tubes
NOTE: The tower and antenna are rotated manually. As more mass is added to the tower, it gets harder to rotate the antenna. It’s a good idea after the first section of the tower is added, to go ahead and rotate the antenna approximately in the right direction then. It will rotate a bit as the tower is lifted, and that’s fine. Fine tune with it all the way up.
- With the brake on (it’d be redundant but still the right thing to yell “brake on” here, since the brake is obviously on if the antenna isn’t going anywhere), lower the elevator to place the next tube.
- Place the tube in the elevator, and lift it up so that the top of the tube almost slides into the bottom of the next tube.
- Lift the tube by hand into the bottom of the previous tube, taking care that the tube keys properly into the upper tube’s bottom end and slides all the way in. It will be obvious when it’s keyed correctly.
- Raise the elevator to hold the tube in place. This works best with the lift captain holding the tube and the cranker using the crank to follow with the elevator.
- If the tube you just lifted is the fourth tube, attach the second collar here (at the bottom of the fourth section).
- Attach the white guylines to the collar corners
- Unwind them, and attach them to the stakes between the upper and lower guylines.
- Make sure they are not tight, and not in the way of the guyline operators. You want slack in the middle lines until the toweris all the way up
- Apply tension to the elevator, yell “BRAKE OFF”, and release the brake.
- The crank operator should crank the tube up, while the guy operators maintain the upright direction of the tower.
- Each spotter is positioned perpindicular to the axis along which two guy operators can pull/let out. If the tower does not look vertical along that axis, yell to the guy operators along it which one should pull more and which one should let out
- When the tube reaches the top, yell “BRAKE ON”, and apply the brake
- If there are tubes remaining on the ground, repeat these steps.
Securing
With the tower all the way up, and the brake on, the upper guylines should be almost tight. Carefully tighten them on each side until they are tight enough to hold the tower in place, but not too tight. It should not be a piano string. Unfortunately, there’s no way to quantify this or spell it in words. It should be determined by someone with some experience.
Refer to Operating the guyline tensioners above for information on how to tighten down the guylines.
After tightening the top guylines, do the same for the middle ones. Do a final check to make sure the tower is as vertical as possible, all components are secure, and the guylines are as tight as desired.
Tie some high-visibility safety flags onto guylines that are likely to be waked into. Consider putting cones and caution tape around the tower.
Teardown and Packing
Lowering the tower is pretty similar to raising it. Essentially the same crew should be used, perhaps with an extra person to pack tubes and other items up as the tower comes down.
The brake status is more important for the lowering procedure than it is for the raising, because the tower wants to go down naturally, while it doesn’t want to go up on its own. Also, the most dangerous part of the process (with the tower high and unguyed) happens in the beginning of the lowering process, and the end of the raising process.
Make sure everyone participating is wearing a hard hat.
Lowering the tower
- First, prepare to apply tension to the guylines. They will be tight, but guy operators should prepare to tighten as soon as the tower starts moving. In fact, they should hold the lines before the tower is moving.
- Raise the elevator to support the tower
- The captain should yell “brake off” and release the brake
- The crank operator will lower the tower so that the bottom of the higher tube can be braked against with the brake.
- The captain should reapply the brake (yelling “brake on”)
- Lower the elevator just a bit more, until the keyed section comes out of the section above it. You may need to pull a bit.
- If the collar for the middle guylines comes down, before lowering that tower section, unclip the guylines and take it off. Put them aside.
- Repeat the process until the tower is all the way down, with the antenna on the top of the last remaining section.
Meanwhile, any spare people can take the tubes and place them back into the tube carrier to keep them out of the crew’s way. After the collar for the middle guylines comes off, the collar can be placed in the footlocker and the middle guylines can be wound up and put in the footlocker as well.
After the tower is lowered, the upper guylines can be removed and placed in the footlocker. Leave the lower ones on until the antenna is removed.
Removing the antenna
- Climb a ladder and loosen whatever is attaching the antenna (mast, mast adapter, etc)
- Lift the antenna, and hand it down to people (potentially via pushers) standing nearby
- Walk the antenna onto sawhorses for disassembly.
Refer to antenna pages for specific demounting instructions.
Remove the mast adapter and/or other things at the top of the bottom section and pack them away into the footlocker.
Packing up
If you did not already, pack up the tubes and all guylines. The tubes go back into the tube carrier, which will drop into the elevator section after it’s done being used. The guylines wind into themselves and go in the footlocker. Remove the last layer of guylines (red) and wind them and pack them.
Now that the guylines are removed, make sure that the elevator is in the down position. pull the small stakes out of the middle of the tower, and put them in the footlocker. Lean over the base section, and put the tube carrier into it. Latch and safety pin so the tubes don’t go anywhere.
Pull the stakes. To do this, use the stake puller from the front of the box trailer. It goes under the stake “handle” and pulls the stakes out of the ground.
To pack things away:
- Slide the main tower tube assembly alongside the other AB-621s in the middle of the box trailer
- Put the footlocker in front of the tower tube sections
- The stakes go in the front of the box trailer.
Common Gotchas and FAQs
- When you pack the tensioners and guylines, make them as short as they will go (turn the screw all the way towards tight). If they are left losser, they may not fit back in the footlockers.
- The second collar (where the white-coded guylines attach) goes at the bottom of the fourth section of tube.
- When you carry the tube section, do not hold it by the top (above the hinged section). Hold it by the structural section.